
Left-handers
If you are left-handed - do not despair!
Some of the best calligraphers and letterers are left-handed, so any difficulties you may experience can be overcome. One of the most well known calligraphers in the world is Gaynor Goffe, who is left-handed.
The greatest problem you will experience is that of pen angle. If a right-hander wants to hold the pen at 45° to the horizontal to write Italic letters, then that is not a problem. For a left-hander, though, holding the pen in a similar way means that the letters will be formed with a 'mirror image' angle. So the pen must be held in a different way and many left-handers find that special left oblique nibs help them in this. It is possible to use straight cut nibs, as right-handers do, and simply twist the wrist to the left to achieve the correct angle, but this may cause tension and strain.
However, there are some lettering styles, such as Uncial, or Half-Uncial where the pen is held either at 0° to the horizontal, or almost 0°, and these don't present quite so many challenges for left-handers. It may also help to set your board up in a slightly different way, as shown here, although having the paper straight is usually recommended.
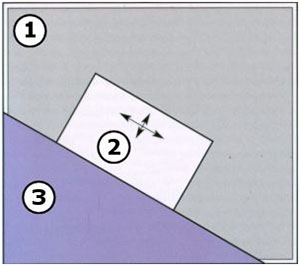
Setting up a board for left-handers
 Taken from the British Library Companion to Calligraphy, Illumination and Heraldry by Patricia Lovett MBE
- Pad of white blotting paper to make a comfortable cushion.
- Writing paper goes up and down and to the left and right so that the hand stays at the most comfortable level.
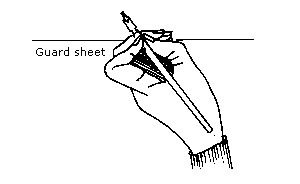
- Guard sheet to protect writing paper.
Hints for left-handed calligraphers from Gaynor Goffe
 Taken from Calligraphy Made Easy by Gaynor Goffe
There are three possible hand positions for left-handed calligraphers:
- Underarm – this is the usual writing position used by left-handers, where the hand rests underneath the line of writing.
- Hook – this pen hold is where the pen writes letters from above the line, and the hand makes a hook-shape.
- Writing line at 90° to the horizontal – rather than writing with the paper horizontal, the paper is lined up at 90° to the horizontal which makes the arm a little more free for left-handers.
I recommend the underarm hand position (position 1 above), the main advantage being that all letter strokes have exactly the same direction as for right-handers (which is not the case with position 2 above where push strokes become pull strokes and vice versa. The other advantage of position 1 is that the paper/writing line is in the same position as for right-handers (which is not the case with position 3 above, see diagrams).
The underarm method can feel difficult to begin with, especially if you are used to everyday handwriting with your hand in the hook position, however there are various ways to minimise any difficulties:
- Use left-oblique nibs. This makes it easier to obtain the steeper pen angles, such as those required for Italic.
- Use a wide drawing board, approximately 30 inches or 75 cm or more, as it helps to write with your left hand slightly to the left of the body to obtain the required pen angles without constricted arm movement.
- Move the writing paper to the left once or twice a line to begin with, this may help in maintaining the steeper pen angles. Once you are used to the underarm writing position it will not be necessary to move the paper to the left much or at all.
- Though I prefer the writing sheet horizontal (as it is easier to judge letter slope), it may help to begin with to slant the sheet down towards the right to help obtain the steeper pen angles (see diagram above).
- Turn the left hand back towards the left, the steeper the pen angle the more the hand is required to turn, a flexible wrist helps!
- Move the left arm as freely as possible from the shoulder when writing and avoid a tight, cramped elbow. Practising large letters with a chisel-edged felt-tip pen helps encourage movement.
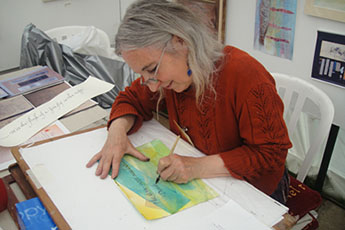 Gaynor Goffe working
The 'hook' position, (2 above), may seem easier if you already handwrite this way, and it is easier, initially, to move the arm freely in this position and easier to obtain all pen angles (though the nib is upside down). However, all the pull strokes of letters become push strokes and vice versa using this position, and this is a considerable disadvantage to the flow of the writing.
Writing with the writing line at 90° to the horizontal (3 above) also allows free arm movement and all pen angles are easily obtained, but it is more difficult to judge letter slope and the fact that the writing is from top to bottom rather than left to right takes some getting used to.
The writing position adopted depends on individual preference, but for the reasons discussed above, I have no hesitation in recommending the underarm writing position; with practice the pen angles can easily be obtained and the arm moved freely.
Gaynor Goffe
 "Calligraphy Made Easy" by Gaynor Goffe
Source: www.clas.co.uk


Exhibition opens in
2107
days
Words Of Wisdom
Calligraphy — the written beauty of feelings.